Wednesday, November 16, 2016

NOW – STOP DOING THIS!


Not organizing your fabric scraps

Will you ever use fabric scraps if you can’t even tell what you have?  Our favorite thing is to organize scraps by colors.  If you don’t have them organized, you might as well throw them out because they won’t be used and they’re taking up precious space!

Overly criticizing your work

Do you nit-pick and over analyze your stitches and points?  Stop it.  Seriously, just stop.  You’re not doing anyone any favors and especially yourself by trash talking.  Why not celebrate that you actually made time to sew?  Congratulate that you finished a project.  Be happy that you created something that didn’t exist before.  That’s pretty cool.

Cutting the same place on your mat      

Want a quick way to wear out your mat?  Always cut at the same place.  Mats need time to heal. 

Sewing over pins

Sewing over a pin causes problems.  Needles bend, dull, or worse—break.  If you have a habit of sewing over pins because you haven’t experienced issues yet, please stop now.

Not maintaining your machine

Clean your machine regularly.  Change the needle when you see stitch quality decrease or hear a gentle thud sound.  Take your machine to the mechanic once in a while.  Be good to your machine and she’ll be good to you!

Not completing your projects   

Having too many unfinished projects is discouraging.  If you find you have a project you started, but haven’t returned to in years, probably you’re discouraged or simply not interested.  This is a great opportunity to donate your half-done project to your guild or a friend who might love a head start on a new project!

Unthreading the machine incorrectly

When you change a spool color, the first thing we normally do is just pull the spool off the machine and pull the thread backwards through the tension discs.  Easy? Yes.  Bad for your machine? Yes.  Time to break the habit and cut the thread at the spool and pull it out through the needle.

Using dull cutting tools

This is a no brainer, but sometimes you just hope our rotary cutter will make it a few more squares or that the frayed fabric edges from your shears aren’t that bad.  Sewing is much easier with crisp edges and choosing to using high quality sharps can help alleviate a lot of frustration and save time.

Using low-quality thread and fabrics

You knew this was coming!  Low quality threads shed lint, break, and may not stand the test of time.  Similarly, fabric quality will affect how long your quilt will last.  We recommend buying the highest quality you can afford.  This will make sewing and quilting much more enjoyable.
·       If you want to get good at quilting, quilt daily.
·       Stop stressing about perfection. Perfection does not exist past 25 inches! Actually, make that 5 inches.
·       Don't be afraid of your tension dial - it was put there for a reason.
·       Quilt because it makes you happy, not because you need to "finish this damn quilt!"
·       If you've never quilted before and are waiting for that perfect day when the kids are grown or you're retired,         STOP WAITING! Today is the day, now is the time, get off your butt and do it!

·       Eat, Quilt, Sleep, Repeat.

FIRE QUILTS - What I learned making a little quilt for my brother

My brother is a retired CalFire firefighter. My dad drove the boy up to Potter Valley in Northern California the night he graduated from San Marcos High School to begin working the summer as a summer job. He never got to go to the graduating party or, more importantly, to get into trouble the night of graduation. Needless to say, my dad felt this action was very important.

Forty-some-odd years later, he retired from CAL-FIRE (formerly the California Division of Forestry) and I promised him a quilt. All these years he said he always wanted an "original work of art" for his house. So, I decided I would make him a nice quilted wall hanging. Easy, right? Don't think so.

Shawnee always seems to difficult things up. I don't know why - it justs seems to be what I do. I take the simplest of tasks and complicate it beyond words. So, let me tell you how the infamous FIRE QUILT came into being - it's a good story of a quilter and her brother.

See, my brother, Brian, has always sent us photos he took while fighting fires. Some pictures of his colleagues working, others he got friends to take of him doing this and that. One particular photo has been my favorite showing him in front of a fire. I told all my friends one day I would make that into a wall hanging for my brother when he retired. Years I searched high and low for good FIRE fabric. I saw lots of fire fabric, but most of it was novelty fabric and it never achieved what I wanted the quilt to say. Then, there was the content of the quilt - well - I come and go on that subject.

Finally, after my brother retired, I decided to try my hand at dying fabric to get some decent fire fabric. Some worked, some - not so much. (Some of my efforts are on my Pinterest page.) Ended up with one pretty good piece, but I had no idea what I was going to do with it. At one point I thought I would just frame the fabric piece and let him hang that as "modern art." That hung on my bedroom door for a year or so - no forward movement on either finishing it or making it into something.

One day I got the great idea to make a Convergence quilt similar to Ricky Timms. I can't say I am in love with it, and it was easy enough to do, but it didn't thrill me. Then, one night as I was thinking about the convergence quilt as I went to bed, I must have dreamt about the FIRE QUILT. I got up the next morning and sent my brother an email asking if I could cut up the FIRE FABRIC panel I gave him, but kept here to finish. His answer was typical: "I don't care what you do with it." Duh. Doesn't he know NEVER say that to a quilter?

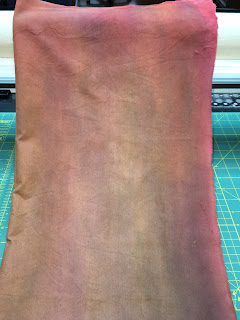
This was a beautiful piece of 'accidental art,' done for my brother and it had all the elements of fire, ashes, burned trees, etc. all in this dyed piece of fabric. He may not have cared, BUT I CARED! What if I made a terrible mistake and cut up the one piece of fabric that came out decent? What if I ruined the whole thing? what if, what if? I was a mess, but I decided to pair up a great piece of batik and the 'fire fabric' and cut it into a convergence quilt. Making that first cut terrified me.

What I decided was I would do it. If it was ruined, perhaps I could make another piece that looked like it. He would never know the difference (I would, but he wouldn't.). Regardless, I calculated the size of the piece of dyed fabric and then calculated the size of the pieces I was going to cut. I was almost sick cutting a stupid piece of fabric, but I did.

Convergence quilts are very simple. Whatever size strips the focus fabric is cut, the accompanying fabric is cut the same from the opposite side. The strips are sewn together attaching the largest focus fabric to the smallest accent fabric all the way across until they are all sewn together as a new piece of fabric. Dig around until you find a good border - and Ta Da! a quilt is born!

Not so quick (or easy). What in the world do you pick as a border? I thought I was going to go crazy over that dilemma. I think I picked out a good piece of batik. It was pretty O.K. Interesting. But I still wasn't in love with it. I sent my brother a picture of it and he named it the CEDAR FIRE. This was a big fire in San Diego County in 2003 which destroyed more than 1800 homes and more than 200,000 acres. Three people were killed and one firefighter died. I lived in Poway, California, and my brother came down from Northern California to help fight the fire. It took almost 3 months before the fire was considered "contained." This fire was horrendous. I lived in Poway, near Rancho Bernardo, California, and we were all traumatized for more than a week. The smoke was heavy and the ashes clogged our swimming pool filters, car filters, windows, and essentially everything!

As I loaded the CEDAR FIRE onto my Gammill, I prayed I wouldn't mess it up. I had no idea what I was going to do other than perhaps make a few "flame" quilt patterns on it. Let's face it - this was only a strip quilt, plain and simple.

QUILT SOLUTION:
Remember a convergence quilt is actually a simple quilt. I think the secret of quilting a simple quilt can be to keep the quilting simple, but add interest and depth. I figured a variety of threads mixed together or even on top of each other could be one way to go. I have a bad habit of being heavy-handed with thread, so I needed to tread lightly.

I found a website that actually talked about the analytics of fires. I know, who would write something on their website about how fires burn, move, and look? Either an arsonist or a firefighter, ha! But, I actually sat and read it all and took notes. Figuring flames travel upward, I actually started the quilting at the bottom of the quilt and moved my quilted flames upward I quilted 'fire flames' using a Superior trilobal polyester as a base over the body of the quilt - but not the borders. Not a heavy quilting, and actually that looked quite nice.

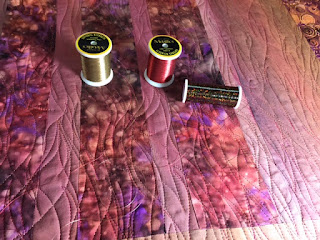
The next step I needed to convey the feeling of fire, so I used a Superior Metallic copper-colored thread. Again, I created more flames going from the bottom up to the top. Lastly, I added a dash of black metallic here and there as flames have black on the outsides (or so the expert says). Looked good - so I stopped. I used one of my friend's ideas to create swirls on the borders to represent the winds created by fire storms using Superior Fantastico and allow the flames to creep into the border area and the wind quilting to creep into the flame area. That was all there was to it. Nothing fancy. No spectacular free motion quilting designs, just simple flames and using great Superior metallic and Fantastico threads! Anyone can do this and the result is an exceptional quilt I hope my brother enjoys for many many years!


Future Fire Quilts: Valley Fire and Rim Fire (Yosemite, CA)


QUILTING WITH MY SISTER-IN-LAW

I BELIEVE I already posted about my sister-in-law, Nancy, a couple years ago. Keep in mind I have known her since she married my brother about 43 years ago. All this time, she knew I was a sewer and quilter. Never once in all those years did she even say she liked quilts. My mom made her a couple quilts - but she didn't seem to me to be excited about them. One went missing for a few years and found out her son had taken it. Luckily not to use for the dogs! My brother is a retired firefighter with CALFIRE (we used to call it CDF) up in Ukiah in Mendocino county, northern California, and they have all their children and grandchildren up there.

Well, she called me up one day and asked if she could come down for a week or so. Oh, and by the way, would I teach her how to quilt! Quilt teachers LOVE to hear the words, "will you teach me how to quilt?" We live to hear those words! I've taught a lot of people to quilt, but I never had to live them while I did it. Needless to say, we both survived the experience, and she has actually asked to come back. She did have to ask me to take a time out once or twice (which I deserved - remember this is family), but we are still friends and I am proud to say she has excelled at this new hobby.

Recently, visiting one of our longtime friends in north, Northern California (Weed, CA), she mentioned she was learning to quilt. Our old friend (not old person, but old in time we have known her) immediately said, "Oh, I have a quilt my mom started. Can you finish it for me?"

WAIT!! Come back and I will have this story finished - and I will show you her finished quilts!

Monday, April 11, 2016

Southern California Council of Quilt Guilds - April 9, 2016

It never rains in Southern California - right!

Traveling to Carson, California to introduce myself to many California quilt guilds.

So, what in the world do you bring with you to tell everyone I lecture about THREAD and SEWING MACHINES? OMG! Well, that is a story in itself, but I believe I did okay trying to convince everyone they all NEED to know how to use thread and needles in their sewing machines (including embroidery and longarms, too). A lot of guild representatives were afraid this subject was way too boring while others figured all us quilters knew all that stuff. . . So, I felt like one of those guys at the county fair who kept trying to get people to watch him slice and dice! Not particularly a pleasant feeling, but I could tell people figured no one could say anything interesting about a spool of thread and how to use it in a sewing machine.

WELL, MY FRIENDS - Let me tell you - I convinced several guilds this is fun. Actually fun and interesting because it is something everyone can go home and use right away. No story about how thread is made, blah, blah, blah (I have sat through enough of those myself).  THIS IS GREAT STUFF, we all need to know and use.

So, my day ended having convinced several guilds this is all most excellent. I had one my friends (also student) with me and we ended up having a terrific time with a lot of very interesting people. I'm not going to bore you with the details, but we had a great time.

Next blog is: QUILTING WITH MY SISTER-IN-LAW, Nancy. Nancy came back down from Northern California to spend a week with me for another "Quilt Camp." You won't believe what she brought with her this time. Evidently, when I started teaching her to quilt I forgot to tell her never tell your friends, "Oh, sure, I can finish your mom's old quilt for you" (thinking all the time that she would include ME in her intentions). We all love our friends and family, but offering to finish someone else's quilt after it has been in storage in a cardboard box you can bet you are in for a few surprises. . . and we were!

Tuesday, December 29, 2015

QUILTING WITH MY SISTER


 WELL - Christmas 2015 came and went quilting with my sister, Robin.  She came in from Arkansas and brought a few jelly rolls.  She said she wanted to "whip up" a quick 1600 inch quilt for a friend.  Great idea, but I couldn't let it go at just a 1600 inch quilt in straight lines - no - not me.  She thought she was going to sit down and sew a whole bunch of strips together and Ta Da! an instant quilt!
Right. Like I am going to let that happen? No - I just had to put my two cents in and I convinced her if she was going to make a 'strip' quilt, to at least put a little style into it.  I showed her some photos from Pinterest and she relented to a "V" strip quilt.  That's when the fun started.

FIRST - she explained she had no pattern. I told her to just sew strips together on the diagonal.  I forgot that although she is a fantastic garment sewer, she doesn't know that much about making quilts. I think that was a mistake. She had no concept of what a rectangle should look like made out of fabric strips.

EASY, I said. Just like this . . . and I printed out a diagram and taped it to the window above the sewing machine. Just sew them at a slant.  I soon found out beginners have issues just sewing strips together, let alone on the diagonal. Turned out this whole idea wasn't the best thought out idea I've had.

So, here's a picture of the diagram from which I figured she could get the idea after I sewed the first couple of strips into the beginning block.

I thought this shouldn't be too hard. Easy Peasy. Forgot - forgot -forgot!

First, this is a classy style for a jelly roll. Shouldn't take too long and we can visit and get other Christmas stuff done. I realized it was off-center (which I carefully explained added an artistic element to a quilt).  and I figured she could just start it and when she got about so far, I would whack it off on the sides creating a left and right edge. The whining started about that time, but continued for 3 days! The sounds coming from my sewing room were awful. She kept telling me she knew how to sew (and she really, really does!), all the time explaining she also knew what a rectangle looked like, but this was no rectangle.  "Don't worry" I promised her, "It'll be a rectangle soon."
Less whining and more sewing. Jeeze!

I soon realized beginner's PULL on their fabric something awful. If you add the 'diagonal' component to that - I can only describe it as a mess.  She kept whining it was never going to stop and it was going to go on forever. I gave her a left edge to make one side shorter, but that didn't help a lot with the fussiness. While I like scraps quilts and their originality, beginners tend towards matching and coordinating. So, she spent a lot of time selecting WHICH colors should go where out of a jelly roll! Oh Boy!

I wasn't standing over her since I had things to do, too. She kept pulling those strips and telling me she was going to be sewing forever. When I looked at what she was doing, she was pulling, pushing, and stretching the poor strips into an un-Godly shape! Ultimately, I could only listen to her sewing and whining for so long, and here is what she ended up with AFTER I whacked off the left and right side. Can you see where this went wrong?

Not bad. We can work with that. Of course, not as long as I would like to see it - but let's face it: there was no way I was going to get another whiney row out of her!

So. . .  a little trimming, a little quilting, and a whole lot of stroking (both sis and the quilt), she finally ended up with the  photo at top.

The PHOTO at the top of this post is the great Christmas Quilt on a bed with the binding. Not bad for 3 days of Quilting at Christmas! Now, do you think she is going to ask to do this again?
We'll see. She's back in Arkansas trying to forget (probably involves alcohol), I'm sure.

What's the moral to this story? Think twice before offering to quilt with your sister at Christmastime. Don't try 'thinking outside the box' with a beginner - they don't get it.

Higgly-Piggly scrap quilts work great for some, but a lot of beginners don't see quilts the same as an experienced quilter.
Sewing with my sister - would I do it again? YOU BET!
REMEMBER - it's not just the final quilt - IT'S THE JOURNEY WE ENDURED!

I had a great time and I think after a little time to heal, she will agree with me?
AND HERE IT IS FINISHED and given to her friend!! I still think she should have made it longer-don't you agree?


Wednesday, March 4, 2015

Can quilting be used as part of the STEM initiative in the Elementary School curriculum?

I am going to start a page about using quilts, quilting and literature to teach elementary kids about quilting. The most important objective I wish to accomplish is to introduce this rich, uniquely American craft to young children as just that, an American craft with all the "hidden riches" of the Core Curriculum and STEM (Science Technology Engineering & Math).

Introducing children to quilting is not intended to create "seamstresses" out of any of the students, but to educate them relative to the diverse lessons quilting contains. If you think about what I have written, I am sure YOU can come up with even more theories contained in quilting:

  • Art - patterns, color theory, repetitions, and just plain enjoyment of an individual creation.
  • Literature - stories, books, and articles that link quilting to real-life and families.
  • Critical thinking - teaching analytical skills that cause one to 'think' about how to solve a particular problem or issue.
  • History and traditions - "The world sews - America Quilts!!" But, where did American quilting come from? Why have we treasured it so much? But, more importantly, can we continue the tradition?
  • Science - Where did dye colors come from (other than Michaels)? What were the first colors used in dye and how were they invented? Does that mean now that we are in the 21st century, all colors and dyes have been discovered? No. just ask Heather Purcell from Superior Threads, she creates new colors with the help of science all the time. Plus - we all had such a great time dyeing fabric last summer!! Whoo hoo!
  • Engineering - I honestly didn't think engineering played into the whole quilting curriculum until I thought about some of the patterns I have created and realized sometimes I had to "engineer" the method used to complete the project. Such as the mouse pincushion. One thing we did recently in Thrilling Threads. There was the matter of the wire mouse tail holding the spool of thread. Without engineering, the mouse would either be sitting on her face or rolled over from the weight of the thread....that was a good one!
  • Technology - You would think technology just doesn't have much of a role in an old American craft such as quilting. Anyone who even peruses the quilt magazines today realizes everything dealing with quilting has gone 21st century. The magazines themselves have all gone to digital editions and speak about adding technology to quilting through computer programs that not only design quilts, but the computers that now power our sewing machines, embroidery machines, and even our Longarm quilting machines! Someone has to know how to build bigger and better equipment and software programs, AND LASTLY,
  • LIFE SKILLS (a hidden benefit) - Just teaching children how to handle a needle, thread the needle, tie a simple knot, do a running stitch, and sew on a button is LIFE ALTERING for them. I cannot explain how all of a sudden boys and girls are going home and beginning to repair all their stuffed toys, their friends' toys, their parents' pants, pockets, and anything else they can use a needle and thread to 'create' something they can use. It is a life skill they will always remember and use. It also allows students to be creative with what they have at home or what they can obtain. Again, it is not designed to create seamstresses out of anyone - merely an appreciation and use of a skill. Remember not everyone can afford to take their pants to a tailor for a pocket or hem repair. Teach the children and they will always know how to do it, forever!

    I will try to post some lesson plans as I develop them in order to share the integration of quilting into any curriculum.  I sincerely hope other teachers may read this blog and would like to start such an educational thread in their elementary school.

    My thanks to my friends in quilting and the 3rd Grade teachers at Tuscany Hills Elementary School who have embraced this project for several years before I ever heard of it, and to those brave teachers who are allowing me to 'mess around' with it! It was their perseverance that got me thinking about this all over again.

    Thursday, April 24, 2014

    How to move a Longarm Quilt Machine – DON’T DO IT ALONE!!!

    (and don't include alcohol or easily excitable friends!!)

    Next came moving day. Like any quilter preparing to begin a new project, I organized. I read article after article about longarms. I prepared with blankets, tools, men (at least 3), trucks, trailer, moving van? I was getting overwhelmed fast. Hopelessly stuck – and here is where quilters are a unique group – one of my friends (a longarmer from Hemet CA) graciously volunteered her husband to organize and help move this behemoth. She said he had moved her Gammill three times and was an expert. Easy Peasy! Right! In my mind I knew with such an expert, this would be no problem. Well – right! Did I have a lot to learn.

    So today we moved it. I figured you just picked it up, put it in the truck and drove it home. Popped it in the house, plugged it in and started quilting. Oh was I wrong – soooo very wrong. These machines come delivered from the company in 3 CRATES. YES, CRATES that are 12 feet long. I didn't know that before I took on this – guess I choose not to think about it. Needless to say Baby had to be taken apart to get out of her former home, and then further disassembled to get up my steps and into my house. All the time three men were unbolting, unscrewing, disassembling pipes, bars, plastic, light bars, and anything else they could get their wrenches on. All I could do was stand and pray to God someone would know how to put all the pieces together again. Yes, please let someone say they could put it all back together again.

    Well, so far today Baby is inside her new home. Not dropped, scratched, or bent. All the pieces are lying quietly in the living room while the table and the quilting machine ‘head’ is in the den. This is no walk in the park. I don’t know why any quilter would volunteer her husband to help move a longarm. This is a test of patience; finding the right tool when you need it; leverage physics, blankets, balancing, and an awful lot of sweat. I swore if I ever sell my house, it will have to be to a quilter and the Gammill goes with it! Thank God my sons weren't here or there would have been pieces of a very expensive machine all over the pavement. But Baby is in now. Not put together, but inside and safe.

    After my friends left, I was so tired, I just wanted to crawl into bed and sleep, but NO – friends and neighbors knew the machine was coming today, so guess what? Just like when you have a new baby at home, everyone has to come by and visit. What does the new baby do? Sleep. So I had the pleasure of showing off Baby unassembled and quite honestly, not as impressive (other than size) as they all thought Baby should be. I had to explain she’s not assembled, which means they will all have to come back and inspect the next phase. That will be tomorrow…maybe. We will have to see if Dave and Nancy have the guts to return to the scene of the crime and if any of us can actually move or bend after yesterday. This was not for the faint of heart. I realized you really have to love this to go through this, notwithstanding using friends to help bear the torture.

    It made me wonder about all the longarms I see advertised for sale on the internet in towns all over the country I didn't know existed. How in the world do these things get packed, shipped, and assembled by the totally unsuspecting? Thank you God for quilting friends who just roll up their sleeves and say “we can get this done.” So, what do you think tomorrow will bring? Will we find all the parts? If we do, will any of us senior citizens remember where they go? Don’t know. That is for another day. All I can say is thank you Dave and Nancy, thank you God, and pray for us all. These are the times that try quilter’s souls . . . to be continued . . .